Showing posts with label c_Administration. Show all posts

Monday, September 19, 2022

TFS | TF400324: Team Foundation services are not available | The underlying connection was closed

 Recently I found this interesting issue on one of my AX2012 Dev machine which connects basically to TFS. 


Problem's keywords

  • TF400324: Team Foundation services are not available
  • The underlying connection was closed


Solution

I found that these following instruction works for my case.

1.      Open up a PowerShell command prompt, running it with elevated privileges

2.      Run the following command for 64 bit applications:

# set strong cryptography on 64 bit .Net Framework (version 4 and above)
Set-ItemProperty -Path 'HKLM:\SOFTWARE\Wow6432Node\Microsoft\.NetFramework\v4.0.30319' -Name 'SchUseStrongCrypto' -Value '1' -Type DWord 

3.      Run this command for 32 bit applications

# set strong cryptography on 32 bit .Net Framework (version 4 and above)
Set-ItemProperty -Path 'HKLM:\SOFTWARE\Microsoft\.NetFramework\v4.0.30319' -Name 'SchUseStrongCrypto' -Value '1' -Type DWord 

4.      Reboot.


References

Sunday, February 14, 2021

OData | 401 Unauthorized issue

Background        

Did you ever find this kind of issue? You have an external app which wants to exchange data with D365FO via OData. You create a Azure application in Azure as usual and whitelist it in D365FO.

It works well when testing a token requesting. But when trying an API call, you get this following error in Postman (or other REST API tools).


401 Unauthorized issue


This post will guide things you can check when you got above error message.


Instructions

There are steps I would recommend you to check it respectively.


  1. [On D365FO AOS machine] Check "Event Viewer" on "Applications and Service Logs -> Microsoft -> Dynamics -> AX-WebApi/Operational" path.

     Thanks Matej  https://stackoverflow.com/questions/58544679/calling-customer-service-results-in-401-unauthorized


     From the above message, you can see obviously that the problem is token validating.


  2. [On Azure] You can verify these follows..

      2.1 Tetant ID - Go overview -> Tenant information i.e. abcabcab-1111-2222-3333-abc123456789

      2.2 Primary domain - Go overview -> Tenant information i.e. d365abc.onmicrosoft.com


      2.3 Login account - See the top right side of the page - The account you use to login Azure and create the "App registrations" (the app to get the token) i.e. mrMillionProblems@d365abc.onmicrosoft.com


     If you're not sure the existing app created correctly, you can create a new App in App registrations as well.


  3. [On D365FO] Make sure account mrMillionProblems@d365abc.onmicrosoft.com can connect to D365FO. If not, add the account in D365FO users.


  4. [On D365FO] Make sure the app in Azure Active Directory applications is configured correctly. Verify Client Id and User ID. 


      User ID can be Admin or other users. However, that user (Admin or whatever) should set its email as mrMillionProblems@d365abc.onmicrosoft.com.


Conclusion

That's all! I hope it might help when you find the similar cases.


Until the next post! 

Monday, May 18, 2020

D365FO - move elements across Dev environments

Hi, moving Dev elements is different when comparing D365FO and AX 2012. 

I was inspired by this link AX7 Move specific elements from one model to another. Check it to see more interesting details.

So, you need these procedures if you are moving "a part" of projects or models. Or exchange something across many Dev box (Onebox).

Let's see how to do it.

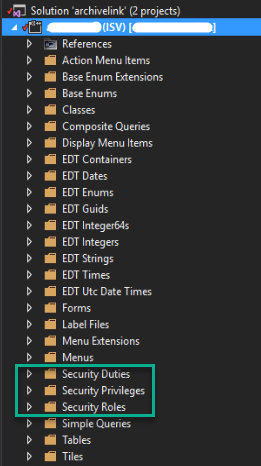
1. For example, you would like to move these new added security objects.


2. You will find that both source and destination server had already the folder structure for those artifacts.


3. Therefore, you can copy those artifacts XML files from source to destination by operating system.


4. Finally, you can use application explorer in VS to move those artifacts to your desired project.


Thanks for reading and until the next post!


Tuesday, June 25, 2019

d365FO | change the incremental number of Sales order

Actually, this is NOT a problem, just a prefer way.

I found sometimes Sales order is increased by a number (25 or random number). It is the effect of Preallocation in Number Sequence which MS recommends to achieve better performance. However, in my case it's in Dev system and here is the way to change it to the simply 1 incremental.


So, before change you find it like this.


How to change

  1. Go to Account receivable -> Setup -> Accounts receivable parameters
  2. Choose "Number sequences" tab 
  3. Find "Sales order" Reference. As the below figure, you will find the way to click through "Sale_61" Number sequence code.


       4. Here, you can change the number to 1.


      5. Save and try to create a new Sales order. Now, you would see it increased by 1 instead.


Until the next post!

Wednesday, June 5, 2019

d365FO | moving all customizations to new OneBox

From http://shootax.blogspot.com/2018/08/d365fo-idea-to-connect-d365fo-projects.html

Until now, MS releases the big change on the application version on April and October. The problem for developer and technical guys is you can upgrade the platform version, but application version. Only download new OneBox from LCS is the way. So if you need to move all Dev stuffs to the new OneBox. The following overview procedures might be useful.

At the source environment
  • Export Models (.axmodel files), Projects (.axpp files), .NET Projects and other metadata.
At the destination environment
  • Import Models
  • Create folders for the local VS solutions and projects files.
  • Create d365FO solution and projects by searching from AOT or importing Projects.
  • Add .NET Projects and other references, if have.
  • Check you get all of d365FO object in VS solution explorer (compare to the source).
  • Build and sync DB the customizations.
  • Full build and sync DB.
  • -------------- Skip the below, if you didn't control the source code version by Azure DevOps (formerly VSTS). --------------
  • Create a new Azure DevOps project (if you don't have the site, create it too). See https://docs.microsoft.com/en-us/dynamics365/unified-operations/dev-itpro/dev-tools/version-control-metadata-navigation
  • Connect the local VS to the new Azure DevOps project.
  • Add solution to source control, check-in all stuffs and then check the files are uploaded to the Azure DevOps project workspace.
  • That's all!

Thanks for reading!

Tuesday, May 14, 2019

AX2012 R3 | Issue while upgrade code | axmodel is from a newer version and cannot be installed

I found an issue while upgrade AX 2012 R3 code to the latest CU (6.3.6000.8.144).


https://cloudblogs.microsoft.com/dynamics365/no-audience/2012/03/29/overview-of-microsoft-dynamics-ax-build-numbers/?source=axsupport


However while I upgrading the binary(kernel) and application, I got the error.

The model file C:\ProgramData\Microsoft\Dynamics AX\Package\2019-05-14 13-57-20\GranularModels\DynamicsAX2012R3_CL4581239.axmodel is from a newer version of Microsoft Dynamics AX (version 6.3.6000.6863) and cannot be installed.


Found update model(File: C:\ProgramData\Microsoft\Dynamics AX\Package\2019-05-14 13-57-20\GranularModels\DynamicsAX2012R3_CL4581665.axmodel, Layer: Syp, Name: Hotfix-KB4492605-4581665-Foundation, Version: 6.3.6000.8136, Partition: Foundation)
Found update model(File: C:\ProgramData\Microsoft\Dynamics AX\Package\2019-05-14 13-57-20\GranularModels\DynamicsAX2012R3_CL4581666.axmodel, Layer: Syp, Name: Hotfix-KB4492767-4581666-Foundation, Version: 6.3.6000.8141, Partition: Foundation)
Found update model(File: C:\ProgramData\Microsoft\Dynamics AX\Package\2019-05-14 13-57-20\GranularModels\DynamicsAX2012R3_CL4581667.axmodel, Layer: Syp, Name: Hotfix-KB4492770-4581667-Foundation, Version: 6.3.6000.8145, Partition: Foundation)
Evaluating applicability requirements for model file: C:\ProgramData\Microsoft\Dynamics AX\Package\2019-05-14 13-57-20\GranularModels\DynamicsAX2012R3-KB4103631-FoundationUpgrade.axmodel
Required model (Layer: SYS, Name: Foundation Upgrade, Version: 6.3.164.0) is installed: False
Evaluating applicability requirements for model file: C:\ProgramData\Microsoft\Dynamics AX\Package\2019-05-14 13-57-20\GranularModels\DynamicsAX2012R3-KB4103631-SYPLabels.axmodel
Required model (Layer: SYS, Name: Foundation, Version: 6.3.164.0) is installed: True
Update model file is installed: False
Getting contents of model file C:\ProgramData\Microsoft\Dynamics AX\Package\2019-05-14 13-57-20\GranularModels\DynamicsAX2012R3_CL4581239.axmodel
Exception: Microsoft.Dynamics.AX.Framework.Tools.ModelManagement.ModelBuildVersionException

 Message: The model file C:\ProgramData\Microsoft\Dynamics AX\Package\2019-05-14 13-57-20\GranularModels\DynamicsAX2012R3_CL4581239.axmodel is from a newer version of Microsoft Dynamics AX (version 6.3.6000.6863) and cannot be installed.


 FullText: Microsoft.Dynamics.AX.Framework.Tools.ModelManagement.ModelBuildVersionException: The model file C:\ProgramData\Microsoft\Dynamics AX\Package\2019-05-14 13-57-20\GranularModels\DynamicsAX2012R3_CL4581239.axmodel is from a newer version of Microsoft Dynamics AX (version 6.3.6000.6863) and cannot be installed.
   at Microsoft.Dynamics.AX.Framework.Tools.ModelManagement.ModelAssemblyReader..ctor(String modelAssemblyFileName, AxUtilContext context, AxUtilConfiguration config, SqlResources sqlResources)
   at Microsoft.Dynamics.AX.Framework.Tools.ModelManagement.AxUtil.View(String modelFileName, Boolean verbose)
   at Microsoft.Dynamics.Setup.ApplicationModelFile.GetModelElements()


Reason
The reason is I originally launched the axupdate.exe from the older KB. In this case, It is KB4032175 (or CU13).
**I launch from KB4032175 instead, because KB4492767 file consists only binary(Kernel) update.


However, in the updating processes, I found the newer update, so I chose the newer one. That caused the above trouble.


Solution
So choose only the CU version that matches to the axupdate version, then the issue is resolved.


Until the next post!

Monday, May 13, 2019

AX2012 | CIL generation warning | sysEPWebPageDefinition

During my AX 2012 R3 RTM installation, I found some warnings left after do 'Generate full CIL'.


Path
\Classes\sysEPWebPageDefinition\deployModuleOnServer (1st line)
\Classes\sysEPWebPageDefinition\deployPageOnServer (2nd line)

Error message
CIL generation: Exception was thrown because the .NET instance method Microsoft.Dynamics.Framework.Portal.Deployment.EPWebModule.DeployWebModuleFromAOT was not found during CIL generation in class sysEPWebPageDefinition.deployModuleOnServer. (1st line)

CIL generation: Exception was thrown because the .NET instance method Microsoft.Dynamics.Framework.Portal.Deployment.EPWebPartPage.ImportWebPartPageFromAOT was not found during CIL generation in class sysEPWebPageDefinition.deployPageOnServer. (2nd line)

Analysis
First of all, it seems to be that you can ignore this kind of warning if you're not interested to use Enterprise portal or SharePoint function.

However if you would like to clean up all of above warning. You need to install SharePoint Foundation 2010 (even you don't use it further).

Solution
1) Install MS SharePoint foundation 2010, and configure a SharePoint site.

2) Do 'Compile forward' the classes.

3) Do 'Generate full CIL' again, the warning should be disappeared.


Thanks for reading!


Ref:
https://community.dynamics.com/ax/f/33/t/227923
https://community.dynamics.com/ax/f/33/t/134993
https://cloudblogs.microsoft.com/dynamics365/no-audience/2011/02/14/sample-steps-on-installing-and-configuring-sharepoint-2010-and-deploying-ax-2009-role-centers-and-enterprise-portal/ (SharePoint install and configure guideline)


AX2012 | CIL generation warning | .NET type Symmetry.TaxEngine.BenefitType is not found during IL generation

During my AX 2012 R3 RTM installation, I found some warnings left after do 'Generate full CIL'.


Path
\Classes\PayrollCalculatePayStatementBenefits\retrieveSymmetryBenefitLimits

Error message
CIL generation: Severe Warning: .NET type Symmetry.TaxEngine.BenefitType is not found during IL generation. 'PayrollCalculatePayStatementBenefits.retrieveSymmetryBenefitLimits' will throw an exception at run time.


Analysis
First of all, it seems to be that you can ignore this kind of warning if you're not interested to use US Tax payroll function.

However if you would like to clean up all of above warning. The possible ways are:

Option A -  Install related components or libraries US Tax payroll functions needed. However at the moment I don't have details about this. ; )  (Would be good if someone can help to clarify as well)

Option B -  And this is my choice. Just omit it! Because of my current tasks not related to that tax feature, so disabling the function is fit to me.

Solution (as skip)
1) Deselect the US payroll function


2) After that, do generate full CIL again. The warnings would be disappeared.


Until the next post!


Thursday, March 7, 2019

d365FO - different ways to move artifacts across environments

Moving or transferring artifacts on d365FO is a bit different from its predecessor like AX 2012 or 2009. In the old versions, mostly we get both source code and binary objects immediately supporting by MorphX or other tools. However not anymore on d365FO.

I found that there are a couple of ways to do that.


So the question is when we use them.

Scenario1  If you'd like to deploy only the functionalities (the application) to the end-users, customers or UAT environment. And the source code doesn't need, then >> Deployable package.

Scenario2  If you would like to copy or move the dev environment where you need the soure code and metadata, then >> importing Models (and importing Projects -- optional).


Thanks for reading!

Monday, February 11, 2019

d365FO - enable maintenance mode on local VM (to change Configuration keys)

Hi, you probably find the following warning message, when you try to change the Configuration keys first time on your d365FO local VM (onebox).


The official information about this issue can be found here https://docs.microsoft.com/en-us/dynamics365/unified-operations/dev-itpro/sysadmin/maintenance-mode

Or you can do it simply as follows.

  • Run command prompt as administrator
  • Execute this command
 C:\AosService\PackagesLocalDirectory\Bin\Microsoft.Dynamics.AX.Deployment.Setup.exe --metadatadir C:\AosService\PackagesLocalDirectory --bindir C:\AosService\PackagesLocalDirectory\Bin --sqlserver . --sqldatabase axdb --sqluser AOSUser --sqlpwd AOSWebSite@123 --setupmode maintenancemode --isinmaintenancemode true  
  • Restart AOS service in IIS
  • Go to and change those configuration keys

After finished, execute again above command with last parameter change to false. This is to disable the maintenance mode back to default.


The command prompt screen should show similar to this one.


Until the next post!


The reference URLs are here. Many thanks for the useful post.

http://axforum.info/forums/showthread.php?s=b503fc57fabe461a222753ed57cb4f8a&p=411569#post411569
https://d365technext.blogspot.com/2018/08/d365fo-one-box-vm-sql-password.html?showComment=1549887006363#c8948549465903155411


Sunday, December 23, 2018

d365FO - Expired certificates issue (ExpiredCertificateException)

I found the issue in my local dev VM. After researched, there are 2 useful solutions I post here as references. Thanks Maha Jamali and Volker Deuss for great post here!

Expired certification issue on development machines

Fix Certificate Issues on Development Machines


Issue/symptom
After running smoothly for long time. One day I got the below message while trying to connect to d365FO.


Analysis
There are many reasons possible for the above message, so the fastest way would be to look at Event Viewer. From below figure, it shows the reason of ExpiredCertificateException with the expired certicate id.


Solution
For this case, we can replicate the expired certificates and set the new expiration period on the new one. The steps are here.

1) Launch "Manage computer certificates"


2) Find the expired certificates. In this case, we need to changes the 4 certificates in the below figure.

3) Double-click on a expired certificate, then copy the thumbprint value.


4) Replicate the certificate with windows power shell (run as admin).

Paste these commands.

Set-Location -Path "cert:\LocalMachine\My"
$OldCert = (Get-ChildItem -Path 4C82C05E452D08A2BE1CC4F92DA24CF98E493F1D)
New-SelfSignedCertificate -CloneCert $OldCert -NotAfter (Get-Date).AddMonths(999)

And then copy or save the new thumbprint value.

B21B106BA4E0F7B090BEA027529C4D2E8D63F281


5) Refresh the "Manage computer certificates" again, then you see the replicated one.


6) Replace the old thumbprint with the new created on the files in  C:/AOSService/webroot


7) Repeat step 3-6 for the rest expired certificates.

8) Finally, reboot the VM. After restarted, wait until all related services are running, then connect to d365FO again.


Thanks for reading. Until the next post!

Wednesday, November 14, 2018

d365FO - how to apply platform update on local VM dev machine

This post shows the actual steps I did when applying the platform update of d365FO on the local VM dev machine (onebox).

Scenario

The onebox contains the version 7.3 platform update 12, and now it's time to update to the latest platform 20.

*** Remark before process

The main reference is Install deployable packages from the command line however only the following parts.


For whatever reason (which I don't know it yet), this topic doesn't work. Install an application (AOT) deployable package on a development environment


Step-by-step

1. This is the current version before changing.


2. Go to LCS website, and download the "platform update" deployable package.


3. Then we got the zip file.


4. Move the file to the non-user folder of the server (for example, avoid to move the file to C:\Users\UserABC\Desktop), then unblock the file.


5. Unzip the file


6. Edit file DefaultTopologyData.xml by put your server name and AOT model name.


7. Run the following commands (see the result of each too, not run all in one step). Please note runbookid and runbookfile are able to be renamed.

 AXUpdateInstaller.exe generate -runbookid="PLATFORM20-runbook" -topologyfile="DefaultTopologyData.xml" -servicemodelfile="DefaultServiceModelData.xml" -runbookfile="PLATFORM20-runbook.xml"  
 AXUpdateInstaller.exe import -runbookfile="PLATFORM20-runbook.xml"  
 AXUpdateInstaller.exe execute -runbookid="PLATFORM20-runbook"  
 AXUpdateInstaller.exe export -runbookid="PLATFORM20-runbook" -runbookfile="PLATFORM20-runbook.xml"  

You will note "AXUpdateInstaller.exe execute" step can take 45 minutes or more as well.

8. At the end of  "AXUpdateInstaller.exe execute". If things run well, then you got this windows. ; )


9. Finally, the platform is updated!


Don't forget to compile all code and DB-sync again to check the conflicts might have.


Until the next post!