Monday, September 19, 2022

TFS | TF400324: Team Foundation services are not available | The underlying connection was closed

 Recently I found this interesting issue on one of my AX2012 Dev machine which connects basically to TFS. 


Problem's keywords

  • TF400324: Team Foundation services are not available
  • The underlying connection was closed


Solution

I found that these following instruction works for my case.

1.      Open up a PowerShell command prompt, running it with elevated privileges

2.      Run the following command for 64 bit applications:

# set strong cryptography on 64 bit .Net Framework (version 4 and above)
Set-ItemProperty -Path 'HKLM:\SOFTWARE\Wow6432Node\Microsoft\.NetFramework\v4.0.30319' -Name 'SchUseStrongCrypto' -Value '1' -Type DWord 

3.      Run this command for 32 bit applications

# set strong cryptography on 32 bit .Net Framework (version 4 and above)
Set-ItemProperty -Path 'HKLM:\SOFTWARE\Microsoft\.NetFramework\v4.0.30319' -Name 'SchUseStrongCrypto' -Value '1' -Type DWord 

4.      Reboot.


References

Thursday, April 14, 2022

X++ | AX2012 - Create a class name list lookup

This is almost the same thing as this post X++ | d365FO - Create a list of table name lookup, but in AX2012.


Thanks Muhammad Afsar Khan here as the original source code and idea comes from his post Display all/specific AOT tables in a lookup.


The overview processes are very similar to D365FO version, but now we don't need to create the temp table:

  1. Add a lookup method to the table that will be used as a form's data source
  2. Add a lookup method to the form control


1. Add a lookup method to the table that will be used as a form's data source


 public void lookupClassName(FormStringControl _control)  
 {  
   QueryBuildDataSource  qbds;  
   Query          q = new Query();  
   SysTableLookup     lookup = SysTableLookup::newParameters(tableNum(UtilidElements), _control, true);  
   qbds = q.addDataSource(tablenum(UtilidElements));  
   qbds.addRange(fieldnum(UtilidElements, recordType)).value(SysQuery::value(UtilElementType::Class));  
   //qbds.addRange(fieldnum(UtilidElements, name)).value(SysQuery::value("ABC*"));  
   //qbds.addSortField(fieldNum(UtilidElements, name), SortOrder::Ascending);  
   lookup.addLookupField(fieldnum(UtilidElements, Name), true);  
   lookup.parmQuery(q);  
   lookup.performFormLookup();  
 }  


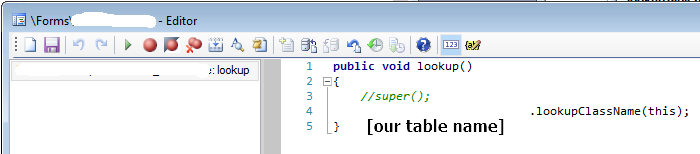
2. Add a lookup method to the form control


 public void lookup()  
 {  
   //super();  
   [OurTableName].lookupClassName(this);  
 }  


Thanks for reading and until the next post!

Sunday, December 26, 2021

X++ | Technique | Conditional select statement

This post is inspired (or in other word, re-written) from the nice post of Ramesh Singh https://stoneridgesoftware.com/conditional-where-clauses-in-select-statements-in-dynamics-ax.


Background

In many situations, we need a conditional select statement. To do so, the most practical way is to use the thing I called it the Query pattern (Query, QueryBuildDataSource, QueryRun, …).

The Query pattern absolultely works well, but there is an alternative technique.


Example

Let's check a standard method \Data Dictionary\Tables\CustTable\Methods\find.

 static CustTable find(CustAccount  _custAccount,  
                       boolean      _forUpdate = false)  
 {  
   CustTable custTable;  
   ;  
   if (_custAccount)  
   {  
     if (_forUpdate)  
           custTable.selectForUpdate(_forUpdate);  
     select firstonly custTable  
           index hint AccountIdx  
           where custTable.AccountNum == _custAccount;  
   }  
   return custTable;  
 }  

Let assume we add a new custom flag field IsActive, then we might need to extend the above implementation. There are several way to implement it. For example, adding a new method and name it like findActive or replacing the above statement with an if-else clause.


However, regarding Ramesh technique, we can make it a bit more simpler by the following code.

 static CustTable find(CustAccount  _custAccount,  
                       boolean      _isActiveCheck = false,)  
                       boolean      _forUpdate = false)  
 {  
   CustTable custTable;  
   ;  
   if (_custAccount)  
   {  
     if (_forUpdate)  
           custTable.selectForUpdate(_forUpdate);  
     select firstonly custTable  
           index hint AccountIdx  
           where custTable.AccountNum == _custAccount  
              && (!_isActiveCheck || custTable.isActive);  
   }  
   return custTable;  
 }  

The above technique is similar to the conventional QueryBuildDataSource.addRange we usually did. 


My opinion

In general, to build a dynamic and complex select statement (or query), the Query pattern is still my preferred choice.

But when adding a small customization as the above example, this technique is quite useful. It avoids the unnecessary redundant and safe a couple line of codes, even sacrifice a little bit self-described characteristic.


Thanks for reading. Until the next post!


Sunday, February 14, 2021

OData | 401 Unauthorized issue

Background        

Did you ever find this kind of issue? You have an external app which wants to exchange data with D365FO via OData. You create a Azure application in Azure as usual and whitelist it in D365FO.

It works well when testing a token requesting. But when trying an API call, you get this following error in Postman (or other REST API tools).


401 Unauthorized issue


This post will guide things you can check when you got above error message.


Instructions

There are steps I would recommend you to check it respectively.


  1. [On D365FO AOS machine] Check "Event Viewer" on "Applications and Service Logs -> Microsoft -> Dynamics -> AX-WebApi/Operational" path.

     Thanks Matej  https://stackoverflow.com/questions/58544679/calling-customer-service-results-in-401-unauthorized


     From the above message, you can see obviously that the problem is token validating.


  2. [On Azure] You can verify these follows..

      2.1 Tetant ID - Go overview -> Tenant information i.e. abcabcab-1111-2222-3333-abc123456789

      2.2 Primary domain - Go overview -> Tenant information i.e. d365abc.onmicrosoft.com


      2.3 Login account - See the top right side of the page - The account you use to login Azure and create the "App registrations" (the app to get the token) i.e. mrMillionProblems@d365abc.onmicrosoft.com


     If you're not sure the existing app created correctly, you can create a new App in App registrations as well.


  3. [On D365FO] Make sure account mrMillionProblems@d365abc.onmicrosoft.com can connect to D365FO. If not, add the account in D365FO users.


  4. [On D365FO] Make sure the app in Azure Active Directory applications is configured correctly. Verify Client Id and User ID. 


      User ID can be Admin or other users. However, that user (Admin or whatever) should set its email as mrMillionProblems@d365abc.onmicrosoft.com.


Conclusion

That's all! I hope it might help when you find the similar cases.


Until the next post! 

Sunday, February 7, 2021

X++ | Reread, refresh, research, and executeQuery

This is my personal memo for these datasource methods which was described very well by this following url. https://community.dynamics.com/365/supply-chain-management/b/axvanyakashperuk/posts/tutorial-58-refresh-reread-research-executequery-which-one-to-use-63

I rewrite it here because I found it's quite difficult to memorize the above concept. The reason is probably these methods are sharing somethings in common, then difficult to distinguish. 


Getting a latest value


Reread     Get the current record value from database to form datasource cache.

Refresh    Get the current record value from form datasource cache to form control.

Commonly used: reread() and then refresh()


Rerunning a form datasource query

Research            Rerun the form datasource query against the database with base query + user interface filters.

ExecuteQuery    Rerun the form datasource query against the database with base query + dev code.

In other words (below are copied directly from above url):

    1) Research - when the research method is called, a new instance of the queryRun is created, using the formDataSource.queryRun().query() as the basis. Therefore, if the user has set up some filters on the displayed data, those will be preserved. 

    2) ExecuteQuery - on the other hand, will use the original query formDataSource.query() as the basis, therefore removing any user filters.

Friday, October 9, 2020

X++ | convert string (as Datetime) to UTCdatetime

 If we got a data from the external application like "2020-10-07T11:55:27". We can use the below code to convert it to UTCdatetime.

The above format is occurred when user send a datetime field from .NET through OData (Edm.Datetime).

 class ConvertStr2UTCdatetime_Job_Test  
 {  
   public static void main(Args _args)  
   {  
     str     	 testStr = "2020-10-07T11:55:27";
     utcdatetime testUTCdateTime;  
     ;  
 
     testStr = strReplace(testStr, "T", " ");  
     testUTCdateTime = str2datetime(testStr, 321);  
     info(strFmt("testUTCdateTime %1", testUTCdateTime));  
     info('done');  
   }  
 }  


Until the next post!


Tuesday, October 6, 2020

D365FO | how to change the target Framework

In D365FO, when a project is created in Visual Studio, it is targeted to the value of "at that time" .NET Framework, for example 4.5.2 or 4.6. This can cause the following warning when building or compiling a project which has the a reference from the newer version.


Warning The primary reference "ABCXXX, Version=1.0.0.0, Culture=neutral, PublicKeyToken=null" could not be resolved because it was built against the ".NETFramework,Version=v4.8" framework. This is a higher version than the currently targeted framework ".NETFramework,Version=v4.6". MyXYZModel (ISV) [my XYZ Model] C:\Program Files (x86)\MSBuild\Microsoft\Dynamics\AX\Microsoft.Dynamics.Framework.Tools.BuildTasks.targets 76


Solution

I follow this useful url.

1. Unload your D365FO project.


2. Edit the rnrproj file


3. Find "TargetFrameworkVersion" tag, and change the value to your desired version.


4. Reload your project.


Monday, July 20, 2020

D365FO | C# | show the current session username

This might be useful when developing something relevant to Web API. Sometimes we might need to know what is the current session running.

This can be done the below C# code.

 string userName = System.Security.Principal.WindowsIdentity.GetCurrent().Name;  

Result: You can see what the exact current session is running. Something like this. 


Until the next post!


Wednesday, June 24, 2020

D365FO | OData - How to filter on Enum Properties

Problem

You are querying the data from D365FO via OData and try something as follows.

 https://aaaaaa.sandbox.ax.dynamics.com/data/PartyLocationPostalAddressesV2?$top=100&$filter=IsPrimary eq 'Yes'   
 or  
 https://aaaaaa.sandbox.ax.dynamics.com/data/PartyLocationPostalAddressesV2?$top=100&$filter=IsPrimary eq True   

Then you got the error.

 <Message>An error has occurred.</Message>  
 <ExceptionMessage>A binary operator with incompatible types was detected. Found operand types 'Microsoft.Dynamics.DataEntities.NoYes' and 'Edm.Boolean' for operator kind 'Equal'.</ExceptionMessage>  
 <ExceptionType>Microsoft.OData.Core.ODataException</ExceptionType>  

Many thanks to..


Solution

 https://aaaaaa.sandbox.ax.dynamics.com/data/PartyLocationPostalAddressesV2?$top=100&$filter=IsPrimary eq Microsoft.Dynamics.DataEntities.NoYes'Yes'  

Until the next post!


Monday, May 18, 2020

D365FO - move elements across Dev environments

Hi, moving Dev elements is different when comparing D365FO and AX 2012. 

I was inspired by this link AX7 Move specific elements from one model to another. Check it to see more interesting details.

So, you need these procedures if you are moving "a part" of projects or models. Or exchange something across many Dev box (Onebox).

Let's see how to do it.

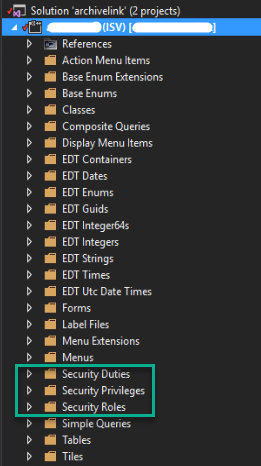
1. For example, you would like to move these new added security objects.


2. You will find that both source and destination server had already the folder structure for those artifacts.


3. Therefore, you can copy those artifacts XML files from source to destination by operating system.


4. Finally, you can use application explorer in VS to move those artifacts to your desired project.


Thanks for reading and until the next post!


Thursday, November 21, 2019

X++ | Image resource location

I rewrite this article from this link https://community.dynamics.com/ax/b/klaasdeforche/posts/forms-tutorial-resources-and-sysimageresources as it might be useful for some devs still work on legacy AX.

You can access these below resource from the forms at the bottom.


AX 4.0     forms\Tutorial_Resources
AX 2009  forms\SysImageResources
AX 2012  forms\SysImageResources

Thanks for reading!

Sunday, November 10, 2019

AX 2012 | get CompanyInfo and Vendor data through T-SQL

This post describes the table relation of Company and Vendor data written in T-SQL. In AX 2012, the information of Company and Vendor do not kept only in a single table, so this might be useful to understand their data model and relation.

Company Info
 select  
    -- DPT.RecId as DPT_RecId  
       --,DPL.RECID as DPL_RecId  
       --,LPA.RecId as LPA_RecId  
     DPT.DATAAREA  
    ,DPT.NAME  
    ,DPT.NAMEALIAS  
    ,DPT.LANGUAGEID  
       ,LPA.Street  
       ,LPA.City  
       ,LPA.ZipCode  
       ,LPA.CountryRegionId  
    --,DPT.PARTYNUMBER  
    --,DPT.INSTANCERELATIONTYPE  
    --,DPT.KNOWNAS  
    --,DPT.PRIMARYADDRESSLOCATION  
    --,DPT.PRIMARYCONTACTEMAIL  
    --,DPT.PRIMARYCONTACTFAX  
    --,DPT.PRIMARYCONTACTPHONE  
    --,DPT.PRIMARYCONTACTTELEX  
    --,DPT.PRIMARYCONTACTURL  
    ,DPT.MODIFIEDDATETIME  
    ,DPT.MODIFIEDBY  
    ,DPT.CREATEDDATETIME  
    ,DPT.CREATEDBY  
    --,DPT.RECVERSION  
    --,DPT.RELATIONTYPE  
    --,DPT.PARTITION  
    --,DPT.EDI_GLN  
 from [dbo].[DIRPARTYTABLE] as DPT  
 left outer join [dbo].[DIRPARTYLOCATION] as DPL   
      on     DPT.RecId = DPL.Party  
      and DPT.PRIMARYADDRESSLOCATION = DPL.Location  
      and DPL.IsPrimary = 1  
 left outer join [dbo].[LOGISTICSPOSTALADDRESS] as LPA   
      on     DPL.Location = LPA.Location  
      and LPA.ValidFrom <= SYSDATETIME()  
      and LPA.ValidTo >= SYSDATETIME()  
 where DPT.INSTANCERELATIONTYPE = 41  


Vendors
 select  
    -- VNT.RecId as VNT_RecId  
       --,DPT.RECID as DPT_RecId  
       --,DPL.RECID as DPL_RecId  
       --,LPA.RecId as LPA_RecId  
       --,TRE.RecId as TRE_RecId  
       --,VBA.RecId as VBA_RecId  
        VNT.DATAAREAID  
    ,VNT.ACCOUNTNUM  
       ,DPT.Name  
       ,LPA.Street  
       ,LPA.City  
       ,LPA.ZipCode  
       ,LPA.CountryRegionId  
       ,TRE.RegistrationNumber          as Tax_regist_num  
       ,VBA.AccountId                    as Bank_ID  
       ,VBA.Name                              as Bank_Name  
       ,VBA.AccountNum                    as Bank_account_num  
       ,VBA.SwiftNo                         as Bank_Swift_code  
       ,VBA.BankIBAN                         as Bank_IBAN  
 from [dbo].[VENDTABLE] as VNT  
 left outer join [dbo].[DIRPARTYTABLE] as DPT   
      on     VNT.Party = DPT.RecId  
 left outer join [dbo].[DIRPARTYLOCATION] as DPL   
      on     DPT.RecId = DPL.Party  
      and DPT.PRIMARYADDRESSLOCATION = DPL.Location  
      and DPL.IsPrimary = 1  
 left outer join [dbo].[LOGISTICSPOSTALADDRESS] as LPA   
      on     DPL.Location = LPA.Location  
      and LPA.ValidFrom <= SYSDATETIME()  
      and LPA.ValidTo >= SYSDATETIME()  
 left outer join [dbo].[TAXREGISTRATION] as TRE   
      on     DPL.RecId = TRE.DirPartyLocation  
      and TRE.ValidFrom <= SYSDATETIME()  
      and TRE.ValidTo >= SYSDATETIME()  
 left outer join [dbo].[VENDBANKACCOUNT] as VBA   
      on     VNT.AccountNum = VBA.VendAccount  


Thanks for reading! Until the next post!


References
https://community.dynamics.com/ax/f/microsoft-dynamics-ax-forum/296010/companyinfo-table-in-ax-2012
https://community.dynamics.com/365/financeandoperations/b/goshoom/posts/queries-to-tables-with-inheritance


Tuesday, October 22, 2019

D365FO - OData simple test by Postman

From the blog series https://shootax.blogspot.com/2019/10/d365fo-data-integration-by-odata-part-1.html, we can also test OData by API tool i.e. Postman. This post describes how to configure and test it base on details mentioned in that series.


Register an app in AAD and white-list in D365FO

Again, we need to register an app. After finished, we should have these values.

  • Application (client) ID
  • Directory (tenant) ID
  • Object ID
  • Client secrets


Configure Postman

After install, do configure as follows.


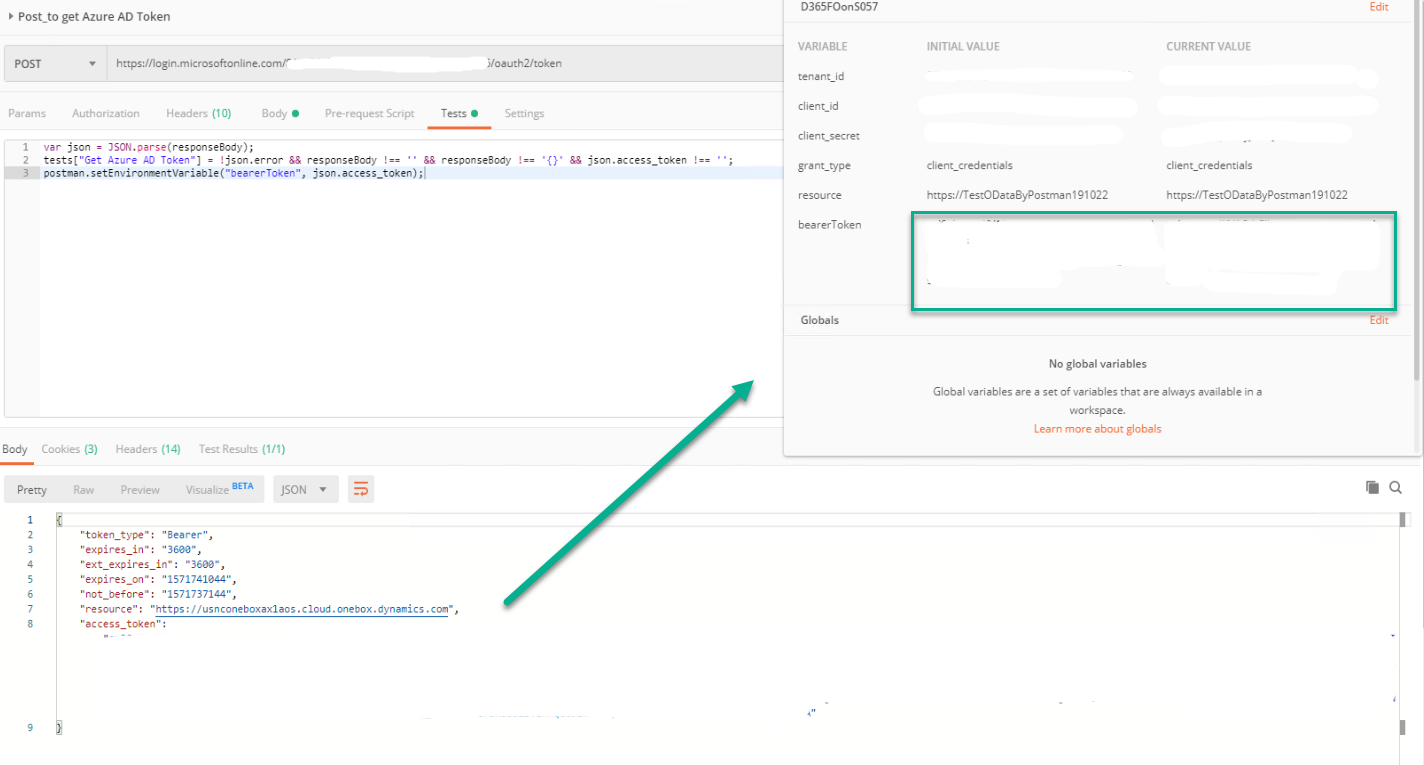
Create a post request to get access token


Create a get request to test OData


That's all!


References:
https://docs.microsoft.com/en-us/dynamics365/fin-ops-core/dev-itpro/data-entities/third-party-service-test

https://docs.microsoft.com/en-us/dynamics365/fin-ops-core/dev-itpro/data-entities/services-home-page#register-a-web-application-with-aad

https://docs.microsoft.com/en-us/azure/active-directory/develop/app-registrations-training-guide

Saturday, October 12, 2019

D365FO - Data integration by OData (Part 5 of 5)

D365FO - Data integration by OData (Part 1 of 5)
D365FO - Data integration by OData (Part 2 of 5)
D365FO - Data integration by OData (Part 3 of 5)
D365FO - Data integration by OData (Part 4 of 5)
D365FO - Data integration by OData (Part 5 of 5) You are here!


Create OData client application


Finally, here's the last of this series.


We will create OData client with AuthenticationUtility and ODataUtility we already made.


Create OData client

First, we create a C# console application project. Name it as 'TestODataClient'.


Next, add the following reference.
  • AuthenticationUtility
  • ODataUtility
  • Microsoft.OData.Client

Then, write the following code in Program.cs file.


 using AuthenticationUtility;  
 using ODataUtility.Microsoft.Dynamics.DataEntities;  
 using Microsoft.OData.Client;  
 using System;  
 using System.Collections.Generic;  
 using System.Linq;  
 using System.Text;  
 using System.Threading.Tasks;  
 namespace TestODataClient  
 {  
   class Program  
   {  
     public static string ODataEntityPath = ClientConfiguration.Default.UriString + "data";  
     public static void CreateMyCar(Resources context)  
     {  
       string CarID = "C0001";  
       DateTime todayDateTime = new DateTime(2019, 10, 11, 0, 0, 0);  
       DateTimeOffset todayDateTimeOffset = new DateTimeOffset(todayDateTime, new TimeSpan(+1, 0, 0));  
       decimal amount = 499999.99m;  
       try  
       {  
         MyCar MyCarEntity = new MyCar();  
         DataServiceCollection<MyCar> MyCarCollection = new DataServiceCollection<MyCar>(context);  
         MyCarCollection.Add(MyCarEntity);  
         MyCarEntity.CarID     = CarID;  
         MyCarEntity.BrandName   = "Suzuki";  
         MyCarEntity.SerieName   = "Swift";  
         MyCarEntity.Color     = "Black";  
         MyCarEntity.Price     = amount;  
         MyCarEntity.PurchasedDate = todayDateTimeOffset;  
         context.SaveChanges(SaveChangesOptions.PostOnlySetProperties | SaveChangesOptions.BatchWithSingleChangeset);  
         Console.WriteLine(string.Format("My car record {0} - created !", CarID));  
       }  
       catch (DataServiceRequestException e)  
       {  
         Console.WriteLine(string.Format("My car record {0} - failed !", CarID));  
       }  
     }  
     static void Main(string[] args)  
     {  
       Uri oDataUri = new Uri(ODataEntityPath, UriKind.Absolute);  
       var context = new Resources(oDataUri);  
       context.SendingRequest2 += new EventHandler<SendingRequest2EventArgs>(  
         delegate (object sender, SendingRequest2EventArgs e)  
         {  
           var authenticationHeader = OAuthHelper.GetAuthenticationHeader();  
           e.RequestMessage.SetHeader(OAuthHelper.OAuthHeader, authenticationHeader);  
         });  
       CreateMyCar(context);  
       Console.ReadLine();  
     }  
   }  
 }  


Now, rebuild the project, run and if anything goes well, then get the following result.


Finally, check the update through the table and OData with the same way from the Part 1.

Table 


Finally, the data is inserted successfully from the external application into D365FO!

That's all!  Thanks for reading!


References
  • Rahul Mohta, Yogesh Kasat and JJ Yadav, Implementing MS Dynamics 365 for Finance and Operations, First published Sep 2017 (book)
  • Simon Buxton, Extending MS Dynamics 365 for Operations Cookbook, First published May 2017 (book)
  • Deepak Agarwal and Abhimanyu Singh, Dynamics 365 for Finance and Operations Development Cookbook, Fourth Edition Aug 2017 (book)
  • https://github.com/OData/odata.net/issues/1220

D365FO - Data integration by OData (Part 4 of 5)

D365FO - Data integration by OData (Part 1 of 5)
D365FO - Data integration by OData (Part 2 of 5)
D365FO - Data integration by OData (Part 3 of 5)
D365FO - Data integration by OData (Part 4 of 5) You are here!
D365FO - Data integration by OData (Part 5 of 5)


Create OData client application


So now, it's time to create ODataUtility.


Why we need this?

This utility will help us to generate all exposed OData service endpoints in D365FO (including one we created before) to be the proxy classes. Then we can connect to those D365FO data entities easily by C# code.


Create ODataUtility

First, we create a C# console application project. Name it as 'ODataUtility'.


Next, use 'Manage NuGet Packages...' to add the following reference.
  • Microsoft.IdentityModel.Clients.ActiveDirectory
  • Microsoft.OData.Client


Then, at Visual Studio go to Tools -> Extensions and Updates and search by 'OData Client code'.


Download and install 'OData v4 Client Code Generator'.


Next, add a 'ODataClient.tt' OData Client into the project.


You can click here OK or Cancel. If click ok, it means the first time it generates without the MetadataDocumentUri. The result will be the same eventually.


Then we put this value https://usnconeboxax1aos.cloud.onebox.dynamics.com/data/$metadata to the MetadataDocumentUri

Before


After


Then, save ODataClient.tt file, and now it's time to click OK and generate the template (proxy classes).

**Tip: The generate process take few seconds, do not interrupt Visual Studio before the generating finished. 


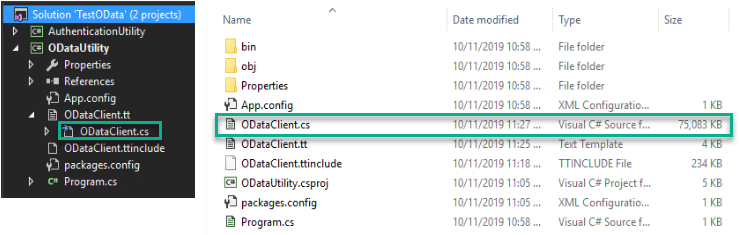
The new created template is ODataClient.cs with around 70 MB file size.


So, the last step is to build the project.

Actually, we should get it finish here, however there are some bug from OData V4 client code generator including the problem that the current version of Visual studio in OneBox machine is VS 2015 which cannot handle such a huge file like ODataClient.cs.

So, when we build the project, we get the error message as follows.

Error CS8103 Combined length of user strings used by the program exceeds allowed limit. Try to decrease use of string literals.


**Thanks toryb comment from this link https://github.com/OData/odata.net/issues/1220 His method works and very useful!

Here is my workaround guideline as per toryb's comment.

1. Close Visual Studio.

2. Copy ODataClient.cs file from VS project folder to another place.

3. Do backup that file in your own way.

4. Open ODataClient.cs by your desired text editor.

5. Search and list with 'Edmx' keyword.

    You will find that area of Edmx variable are between line 50,995th and 325,713th !!


6. Cut the XML part (start at <edmx:Edmx...  and  ...</edmx:Edmx> at the end) and paste to the new file.

7. In the new file, replace all "" (2 double quote) with " (single double quote) because they were generated incorrectly. This step will take some minutes.


8. Save edmx.xml file.

9. Back to ODataClient.cs file, put the file name as the value of Edmx variable like this.

    private const string Edmx = @"edmx.xml";

10. Search by 'CreateXmlReader' keyword and create an additional overload of CreateXmlReader() that does not take any parameters as follows.

Before


After


11. Replace global::System.Xml.XmlReader reader = CreateXmlReader(Edmx);
      with global::System.Xml.XmlReader reader = CreateXmlReader();


12. Save ODataClient.cs file.

13. Copy ODataClient.cs and Edmx.xml back to VS project folder.

14. Launch Visual Studio

15. Add Edmx.xml file into the project and update it's Build Action is "Content" and the Copy to Output Directory is set to "Copy if Newer" or "Copy Always". This will make sure the xml file is distributed with the library / application.


So now, rebuild the project again. And the result should be ok as follows.


=== End of Part 4 ===