Showing posts with label tech_data integration. Show all posts

Sunday, February 14, 2021

OData | 401 Unauthorized issue

Background        

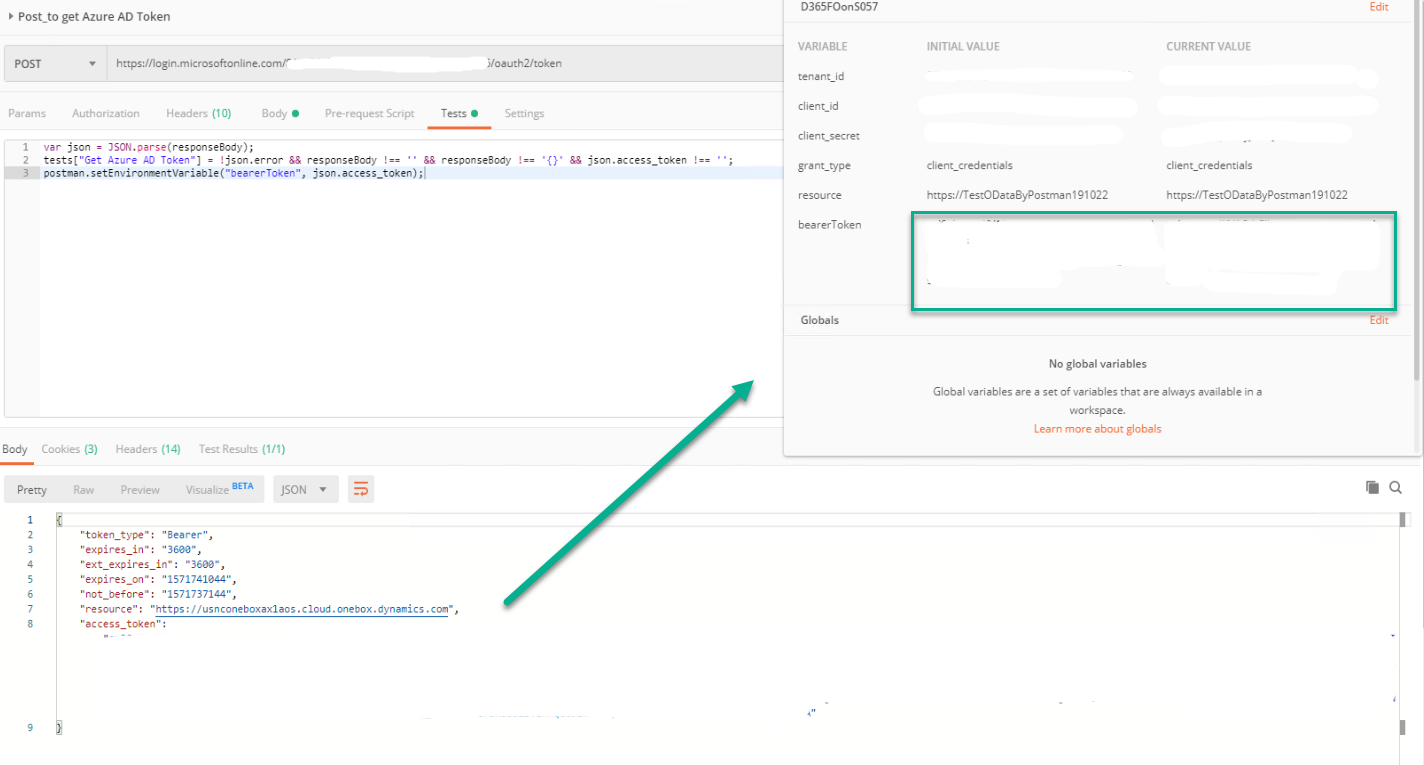
Did you ever find this kind of issue? You have an external app which wants to exchange data with D365FO via OData. You create a Azure application in Azure as usual and whitelist it in D365FO.

It works well when testing a token requesting. But when trying an API call, you get this following error in Postman (or other REST API tools).


401 Unauthorized issue


This post will guide things you can check when you got above error message.


Instructions

There are steps I would recommend you to check it respectively.


  1. [On D365FO AOS machine] Check "Event Viewer" on "Applications and Service Logs -> Microsoft -> Dynamics -> AX-WebApi/Operational" path.

     Thanks Matej  https://stackoverflow.com/questions/58544679/calling-customer-service-results-in-401-unauthorized


     From the above message, you can see obviously that the problem is token validating.


  2. [On Azure] You can verify these follows..

      2.1 Tetant ID - Go overview -> Tenant information i.e. abcabcab-1111-2222-3333-abc123456789

      2.2 Primary domain - Go overview -> Tenant information i.e. d365abc.onmicrosoft.com


      2.3 Login account - See the top right side of the page - The account you use to login Azure and create the "App registrations" (the app to get the token) i.e. mrMillionProblems@d365abc.onmicrosoft.com


     If you're not sure the existing app created correctly, you can create a new App in App registrations as well.


  3. [On D365FO] Make sure account mrMillionProblems@d365abc.onmicrosoft.com can connect to D365FO. If not, add the account in D365FO users.


  4. [On D365FO] Make sure the app in Azure Active Directory applications is configured correctly. Verify Client Id and User ID. 


      User ID can be Admin or other users. However, that user (Admin or whatever) should set its email as mrMillionProblems@d365abc.onmicrosoft.com.


Conclusion

That's all! I hope it might help when you find the similar cases.


Until the next post! 

Wednesday, June 24, 2020

D365FO | OData - How to filter on Enum Properties

Problem

You are querying the data from D365FO via OData and try something as follows.

 https://aaaaaa.sandbox.ax.dynamics.com/data/PartyLocationPostalAddressesV2?$top=100&$filter=IsPrimary eq 'Yes'   
 or  
 https://aaaaaa.sandbox.ax.dynamics.com/data/PartyLocationPostalAddressesV2?$top=100&$filter=IsPrimary eq True   

Then you got the error.

 <Message>An error has occurred.</Message>  
 <ExceptionMessage>A binary operator with incompatible types was detected. Found operand types 'Microsoft.Dynamics.DataEntities.NoYes' and 'Edm.Boolean' for operator kind 'Equal'.</ExceptionMessage>  
 <ExceptionType>Microsoft.OData.Core.ODataException</ExceptionType>  

Many thanks to..


Solution

 https://aaaaaa.sandbox.ax.dynamics.com/data/PartyLocationPostalAddressesV2?$top=100&$filter=IsPrimary eq Microsoft.Dynamics.DataEntities.NoYes'Yes'  

Until the next post!


Tuesday, October 22, 2019

D365FO - OData simple test by Postman

From the blog series https://shootax.blogspot.com/2019/10/d365fo-data-integration-by-odata-part-1.html, we can also test OData by API tool i.e. Postman. This post describes how to configure and test it base on details mentioned in that series.


Register an app in AAD and white-list in D365FO

Again, we need to register an app. After finished, we should have these values.

  • Application (client) ID
  • Directory (tenant) ID
  • Object ID
  • Client secrets


Configure Postman

After install, do configure as follows.


Create a post request to get access token


Create a get request to test OData


That's all!


References:
https://docs.microsoft.com/en-us/dynamics365/fin-ops-core/dev-itpro/data-entities/third-party-service-test

https://docs.microsoft.com/en-us/dynamics365/fin-ops-core/dev-itpro/data-entities/services-home-page#register-a-web-application-with-aad

https://docs.microsoft.com/en-us/azure/active-directory/develop/app-registrations-training-guide

Saturday, October 12, 2019

D365FO - Data integration by OData (Part 5 of 5)

D365FO - Data integration by OData (Part 1 of 5)
D365FO - Data integration by OData (Part 2 of 5)
D365FO - Data integration by OData (Part 3 of 5)
D365FO - Data integration by OData (Part 4 of 5)
D365FO - Data integration by OData (Part 5 of 5) You are here!


Create OData client application


Finally, here's the last of this series.


We will create OData client with AuthenticationUtility and ODataUtility we already made.


Create OData client

First, we create a C# console application project. Name it as 'TestODataClient'.


Next, add the following reference.
  • AuthenticationUtility
  • ODataUtility
  • Microsoft.OData.Client

Then, write the following code in Program.cs file.


 using AuthenticationUtility;  
 using ODataUtility.Microsoft.Dynamics.DataEntities;  
 using Microsoft.OData.Client;  
 using System;  
 using System.Collections.Generic;  
 using System.Linq;  
 using System.Text;  
 using System.Threading.Tasks;  
 namespace TestODataClient  
 {  
   class Program  
   {  
     public static string ODataEntityPath = ClientConfiguration.Default.UriString + "data";  
     public static void CreateMyCar(Resources context)  
     {  
       string CarID = "C0001";  
       DateTime todayDateTime = new DateTime(2019, 10, 11, 0, 0, 0);  
       DateTimeOffset todayDateTimeOffset = new DateTimeOffset(todayDateTime, new TimeSpan(+1, 0, 0));  
       decimal amount = 499999.99m;  
       try  
       {  
         MyCar MyCarEntity = new MyCar();  
         DataServiceCollection<MyCar> MyCarCollection = new DataServiceCollection<MyCar>(context);  
         MyCarCollection.Add(MyCarEntity);  
         MyCarEntity.CarID     = CarID;  
         MyCarEntity.BrandName   = "Suzuki";  
         MyCarEntity.SerieName   = "Swift";  
         MyCarEntity.Color     = "Black";  
         MyCarEntity.Price     = amount;  
         MyCarEntity.PurchasedDate = todayDateTimeOffset;  
         context.SaveChanges(SaveChangesOptions.PostOnlySetProperties | SaveChangesOptions.BatchWithSingleChangeset);  
         Console.WriteLine(string.Format("My car record {0} - created !", CarID));  
       }  
       catch (DataServiceRequestException e)  
       {  
         Console.WriteLine(string.Format("My car record {0} - failed !", CarID));  
       }  
     }  
     static void Main(string[] args)  
     {  
       Uri oDataUri = new Uri(ODataEntityPath, UriKind.Absolute);  
       var context = new Resources(oDataUri);  
       context.SendingRequest2 += new EventHandler<SendingRequest2EventArgs>(  
         delegate (object sender, SendingRequest2EventArgs e)  
         {  
           var authenticationHeader = OAuthHelper.GetAuthenticationHeader();  
           e.RequestMessage.SetHeader(OAuthHelper.OAuthHeader, authenticationHeader);  
         });  
       CreateMyCar(context);  
       Console.ReadLine();  
     }  
   }  
 }  


Now, rebuild the project, run and if anything goes well, then get the following result.


Finally, check the update through the table and OData with the same way from the Part 1.

Table 


Finally, the data is inserted successfully from the external application into D365FO!

That's all!  Thanks for reading!


References
  • Rahul Mohta, Yogesh Kasat and JJ Yadav, Implementing MS Dynamics 365 for Finance and Operations, First published Sep 2017 (book)
  • Simon Buxton, Extending MS Dynamics 365 for Operations Cookbook, First published May 2017 (book)
  • Deepak Agarwal and Abhimanyu Singh, Dynamics 365 for Finance and Operations Development Cookbook, Fourth Edition Aug 2017 (book)
  • https://github.com/OData/odata.net/issues/1220

D365FO - Data integration by OData (Part 4 of 5)

D365FO - Data integration by OData (Part 1 of 5)
D365FO - Data integration by OData (Part 2 of 5)
D365FO - Data integration by OData (Part 3 of 5)
D365FO - Data integration by OData (Part 4 of 5) You are here!
D365FO - Data integration by OData (Part 5 of 5)


Create OData client application


So now, it's time to create ODataUtility.


Why we need this?

This utility will help us to generate all exposed OData service endpoints in D365FO (including one we created before) to be the proxy classes. Then we can connect to those D365FO data entities easily by C# code.


Create ODataUtility

First, we create a C# console application project. Name it as 'ODataUtility'.


Next, use 'Manage NuGet Packages...' to add the following reference.
  • Microsoft.IdentityModel.Clients.ActiveDirectory
  • Microsoft.OData.Client


Then, at Visual Studio go to Tools -> Extensions and Updates and search by 'OData Client code'.


Download and install 'OData v4 Client Code Generator'.


Next, add a 'ODataClient.tt' OData Client into the project.


You can click here OK or Cancel. If click ok, it means the first time it generates without the MetadataDocumentUri. The result will be the same eventually.


Then we put this value https://usnconeboxax1aos.cloud.onebox.dynamics.com/data/$metadata to the MetadataDocumentUri

Before


After


Then, save ODataClient.tt file, and now it's time to click OK and generate the template (proxy classes).

**Tip: The generate process take few seconds, do not interrupt Visual Studio before the generating finished. 


The new created template is ODataClient.cs with around 70 MB file size.


So, the last step is to build the project.

Actually, we should get it finish here, however there are some bug from OData V4 client code generator including the problem that the current version of Visual studio in OneBox machine is VS 2015 which cannot handle such a huge file like ODataClient.cs.

So, when we build the project, we get the error message as follows.

Error CS8103 Combined length of user strings used by the program exceeds allowed limit. Try to decrease use of string literals.


**Thanks toryb comment from this link https://github.com/OData/odata.net/issues/1220 His method works and very useful!

Here is my workaround guideline as per toryb's comment.

1. Close Visual Studio.

2. Copy ODataClient.cs file from VS project folder to another place.

3. Do backup that file in your own way.

4. Open ODataClient.cs by your desired text editor.

5. Search and list with 'Edmx' keyword.

    You will find that area of Edmx variable are between line 50,995th and 325,713th !!


6. Cut the XML part (start at <edmx:Edmx...  and  ...</edmx:Edmx> at the end) and paste to the new file.

7. In the new file, replace all "" (2 double quote) with " (single double quote) because they were generated incorrectly. This step will take some minutes.


8. Save edmx.xml file.

9. Back to ODataClient.cs file, put the file name as the value of Edmx variable like this.

    private const string Edmx = @"edmx.xml";

10. Search by 'CreateXmlReader' keyword and create an additional overload of CreateXmlReader() that does not take any parameters as follows.

Before


After


11. Replace global::System.Xml.XmlReader reader = CreateXmlReader(Edmx);
      with global::System.Xml.XmlReader reader = CreateXmlReader();


12. Save ODataClient.cs file.

13. Copy ODataClient.cs and Edmx.xml back to VS project folder.

14. Launch Visual Studio

15. Add Edmx.xml file into the project and update it's Build Action is "Content" and the Copy to Output Directory is set to "Copy if Newer" or "Copy Always". This will make sure the xml file is distributed with the library / application.


So now, rebuild the project again. And the result should be ok as follows.


=== End of Part 4 ===